Cabbage and kale are among the hardiest and most nutritious vegetables a home gardener can grow. They are also very easy to grow, especially for home vegetable gardeners in cooler climates. Beautiful, in shades of pale yellow to wrinkled steel blue and ranging in flavor from sweet and crisp to tangy, cabbage and kale are versatile vegetables and there�s a variety suited to almost every garden.
Read More...
[Source: About.com Gardening: Most Popular Articles]
Thursday, January 29, 2009
Mint
Plants in the mint family are very hardy perennials with vigorous growth habits. Mint, left to its own devices, will spread quickly and become a nuisance. However, it is very popular as a flavorful herb and the plants can be grown easily. Just try to chose a spot where you won�t mind the rampant growth or grow it in a confined space.
Read More...
[Source: About.com Gardening: Most Popular Articles]
Read More...
[Source: About.com Gardening: Most Popular Articles]
Spring Rose Care
A bit of spring rose care will mean healthier roses throughout the growing season. Although roses may bloom even if gardeners neglect them entirely, they will have fewer problems and more blooms if you do some spring rose pruning and feeding, as outlined below. The efforts you make in caring for your roses in the early spring will mean that many fewer problems to tend to during the growing season.
Read More...
[Source: About.com Gardening: Most Popular Articles]
Read More...
[Source: About.com Gardening: Most Popular Articles]
Garden for Dollars, Grow Asparagus
One of my favorite things about gardening is that you’re making free food. Well, not exactly free is it? Anymore than anything is free. You spend the time, you buy the gardening supplies, fertilizer, etc. Many people probably do garden at a loss, I’m sure I do, but I enjoy it, so there is that.
There [...]
Read More...
[Source: Backyard Gardening Blog]
There [...]
Read More...
[Source: Backyard Gardening Blog]
Growing Hot Peppers
Chili peppers have the distinction of being welcome I both vegetable gardens and flower borders. While hot peppers may seem exotic, they are very easy to grow almost anywhere, even indoors. The assortment of hot peppers, whether Jalapeno, Serrano, Cayenne, Habanero or Thai, offers something for every garden and every pallette.
Read More...
[Source: About.com Gardening: Most Popular Articles]
Read More...
[Source: About.com Gardening: Most Popular Articles]
Flower Gifts for Gardeners
Choosing flowers for someone who gardens can be as intimidating as cooking for a gourmet. Don’t think that because they grow flowers, they don't like receiving them as a gift. Many gardeners hate to cut flowers from their own gardens to bring indoors; they like to see their garden full of splendor. So a gift of cut flowers or a flowering plant is a guilt free pleasure that might just inspire them to garden some more.
Read More...
[Source: About.com Gardening: Most Popular Articles]
Read More...
[Source: About.com Gardening: Most Popular Articles]
Digitalis 'Candy Mountain' (Digitalis purpurea)
Digitalis 'Candy Mountain' (Digitalis purpurea)
Read More...
[Source: About.com Gardening: Most Popular Articles]
Read More...
[Source: About.com Gardening: Most Popular Articles]
How Many Seeds Per Ounce or Gram
 Many seed packets and mail order catalogs list how many seeds you are buying by the ounce or by the gram, but they don't tell you how many actual seeds you are getting.
 The conversions below should help clear this up so you can better estimate how much seed you'll need to buy.
Vegetable Seeds Per Ounce
(28 grams = 1 ounce)
Beets: 1,600
Broccoli: 9,000
Brussels Sprouts: 9,000
Cabbage: 9,000
Carrots: 23,000
Corn: 120-180
Cucumbers: 1,100
Eggplant: 6,500
Lettuce: 25,000
Onions: 8,500
Peas: 90-175
Peppers: 4,500
Pumpkins: 100-300
Radishes: 2,500
Snap Beans: 100-125
Spinach: 2,800
Squash: 120-400
Tomaotes: 11,500
Flower Seeds Per Ounce
(28 grams = 1 ounce)
Blanket Flower: 15,000
Calendula: 3,500
Candytuft: 9,500
Coneflower: 40,000
Cornflower: 6,000
Cosmos: 4,000 - 5,000
Larkspur: 8,000
Marigold: 9,000
Morning glory: 800
Nasturtium: 175
Poppy: 260,000
Stock: 18,500
Strawflower: 45,000
Sunflower: 500-700
Zinnia: 2,500 - 4,000
For more Gardening Tips and Gardening Advice visit our main gardening website at Weekend Gardener Monthly Web Magazine - www.weekendgardener.net
Have good week!
Read More...
[Source: Gardening Tips and Ideas]
Wednesday, January 28, 2009
Think Spring - Create a Welcome Home with Potted Spring Blooming Bulbs.
I wonder if the Dutch ever get sick of tulips, the way we tire of black-eyed Susans and Hosta? It seems hard to believe, since tulips are such...
Read More...
[Source: About.com Gardening]
Read More...
[Source: About.com Gardening]
Growing Nasturtiums
Nasturtiums are cool season annual flowers in rich, jewel tone colors. Nasturtiums are extremely easy to grow, practically growing themselves. There are bushy, trailing and climbing nasturtiums to fill every gardening need. They are even edible. You won�t usually find seedlings of nasturtiums, but the large seeds germinate quickly and the plants bloom all season. Here are some more nasturtium growing tips.
Read More...
[Source: About.com Gardening: Most Popular Articles]
Read More...
[Source: About.com Gardening: Most Popular Articles]
Soil pH
Gardeners are often told that a key to growing great plants is to check the soil's pH. What is meant by soil pH and why should it matter so much in the garden? Here's why...
Read More...
[Source: About.com Gardening: Most Popular Articles]
Read More...
[Source: About.com Gardening: Most Popular Articles]
Tuesday, January 27, 2009
Tomato Growing Tips
Tomato plants know what they like and they grow well when you give it to them. Growing the best tasting or the earliest tomato is a great source of pride for the home gardener and here are 10 tips for growing terrific tomatoes.
Read More...
[Source: About.com Gardening: Most Popular Articles]
Read More...
[Source: About.com Gardening: Most Popular Articles]
Consider A Cutting Garden
Cutting gardens or cut flower gardens are a great way to bring your garden indoors. Well planned cutting gardens can grow enough flowers to create bouquets for the entire growing season. Cutting gardens can include long flowering annuals, seasonal perennials and colorful foliage. Here are some plant ideas for your cutting garden.
Read More...
[Source: About.com Gardening: Most Popular Articles]
Read More...
[Source: About.com Gardening: Most Popular Articles]
Growing Violas
Violas and pansies are such stalwarts that gardeners take them for granted . These cool season bloomers are great for spring and fall gardens and for bridging the seasons in warmer areas, where they�ll bloom right through the winter. Newer violas have bolder colors and larger flowers that bloom longer. Even better, the new violas and pansies exhibit better heat and cold tolerance than the remarkably hardy varieties where familiar with. Read how to grow the best violas for your garden.
Read More...
[Source: About.com Gardening: Most Popular Articles]
Read More...
[Source: About.com Gardening: Most Popular Articles]
No Fruit on Your Fruit Tree?
There are many reasons fruit trees can take years to begin bearing fruit. Home fruit growers need to make sure their fruit trees are given the right care and growing conditions.
gardening fruit apple trees home backyard orchard not setting fruiting gardens
Read More...
[Source: About.com Gardening: Most Popular Articles]
gardening fruit apple trees home backyard orchard not setting fruiting gardens
Read More...
[Source: About.com Gardening: Most Popular Articles]
Pruning Tomato Suckers
Tomato suckers, or side shoots, are the growth that appears in the crotch between the stem and a branch. If left to grow, tomato suckers will become another main stem with branches, flowers, fruit and more suckers of their own. Sometimes that�s good, sometimes not so good. Here are some guidelines for when to prune your tomatoes and how much.
Read More...
[Source: About.com Gardening: Most Popular Articles]
Read More...
[Source: About.com Gardening: Most Popular Articles]
Garden Bones in Garden Design
In garden design, the term 'garden bones' refers to something architectural the defines the structure of a garden. It's not as hard as you think to create bones in a garden. Here are some ideas to get you started.
Read More...
[Source: About.com Gardening: Most Popular Articles]
Read More...
[Source: About.com Gardening: Most Popular Articles]
Garden Maintenance
Flower gardens require constant maintenance to look their best. Common garden chores like pruning, pinching and
deadheading are easy to master, as show here in this step-by-step photo tutorial.
Read More...
[Source: About.com Gardening: Most Popular Articles]
deadheading are easy to master, as show here in this step-by-step photo tutorial.
Read More...
[Source: About.com Gardening: Most Popular Articles]
Roses from Cuttings
Ever wonder if you could root and grow branches from your favorite rose bush? With a little care, roses root very easily. You won't always get exactly what you started with, but it's fun trying. And here's how.
Read More...
[Source: About.com Gardening: Most Popular Articles]
Read More...
[Source: About.com Gardening: Most Popular Articles]
Designing Herb Gardens
Herbs don�t need to be grown in a garden of their own, but a designated herb garden is a luxury for all the senses and working in an herb garden is as much pleasure as it is toil. Whether you want an iconic four-square herb garden, a scented herb border or a few kitchen herbs on the windowsill, here are some tips for creating an herb garden to enjoy.
Read More...
[Source: About.com Gardening: Most Popular Articles]
Read More...
[Source: About.com Gardening: Most Popular Articles]
Waking Up Your Roses
When you think about it, roses are probably the most common of garden plants. I mean, what garden doesn't have a rose or two in it? ...
Read More...
[Source: About.com Gardening]
Read More...
[Source: About.com Gardening]
Lettuce
Lettuce is one of the few vegetables we eat fresh and uncooked. Shouldn't it be as fresh as can be. Salad greens are easy to grow and there are literally hundreds of varieties. That pale green head you see at the grocery store is just the tip of the iceberg. Here's a look at growing and choosing the best lettuce.
Read More...
[Source: About.com Gardening: Most Popular Articles]
Read More...
[Source: About.com Gardening: Most Popular Articles]
Magnolias - Spring Flowering Charmers
Magnolia trees are associated with the Old South and a gentler lifestyle. But there are plenty of magnolia trees for cooler climates and less hospitable locations. David Beaulieu...
Read More...
[Source: About.com Gardening]
Read More...
[Source: About.com Gardening]
Self-Seeding Annual Flowers
Many annual flowers offer the bonus of being self-seeders. Self-sowing annuals will weave their way though your garden, year after year, giving it a natural, cottage garden feel. There's a wide choice of annual flowers that will self-seed and it takes very little effort to get them going.
Read More...
[Source: About.com Gardening: Most Popular Articles]
Read More...
[Source: About.com Gardening: Most Popular Articles]
Spring Vegetable Gardening
Spring Vegetable Gardening - Vegetables that Enjoy the Cool, Early Weather of Spring
Read More...
[Source: About.com Gardening: Most Popular Articles]
Read More...
[Source: About.com Gardening: Most Popular Articles]
Sunday, January 25, 2009
Plants That Add Eye-Catching Winter Color
 Just because it's winter, doesn't mean you can't have some outstanding color around your house and garden.
 Hen and Chicks (Sempervivum soboliferum) is a sun loving perennial that grows up to 6 inches (15 cm) tall and does very well in zones 5 to 10 which means it can take cold down to -10° F or -23.4 ° C and still do very well.
Now the Hens and Chicks (Sempervivum) I'm talking about should not be confused with Hens and Chicks (Echeveria) which is an annual and hardy only to Zones 9 to 11.
Having the same common name can lead to some confusion between the two plants so make sure you are purchasing the correct variety (Sempervivum).
What makes Hens and Chicks so perfect is that they are not only succulents that have beautiful leaves that add both ornate interest and unique texture to your garden, but as the common name Hen and Chicks suggests, the mature plants produce new offsets that can be planted.
The mature plant, the hen, develops numerous offsets called chicks, which surround the mature plant until the offsets are mature enough to support themselves.
The chicks can be pulled or cut off and transplanted so you get many new plants for free. The hen actually benefits from the removal of offsets since much of its energy is used to supporting the chicks, so the entire process is very healthy for both hen and chick.
Hens and Chicks are also unique for their leaf shapes, textures, and colors which can range from green to blue, purple to pink and even gray.
Small rosettes of succulent leaves form colorful tidy evergreen mounds which will continue to multiply, creating a living carpet of color in your landscape.
They are perfect as a ground cover, in a rock garden, rock wall, decorative container, or even grown indoors provided they get enough light.
So if you're in need of some color this winter, give these plants a try, you'll really love them.
Link to: Climate Zones Maps
For more Gardening Tips and Gardening Advice visit our main gardening website at Weekend Gardener Monthly Web Magazine - www.weekendgardener.net
Have great week!
Read More...
[Source: Gardening Tips and Ideas]
Rice Bale Raised Beds.
Raised beds made of bales of straw.
Read More...
[Source: About.com Gardening: Most Popular Articles]
Read More...
[Source: About.com Gardening: Most Popular Articles]
Outdoor Houseplants
It is possible to pot up some of your favorite garden plants and bring them indoors as houseplants. Many tropical and tender perennials are capable of growing well in the house, if given the right growing conditions. Growing these plants as houseplants requires good light and humidity. If you’re home has what it takes, here’s a list of potential houseplants that may be growing in your garden.
Read More...
[Source: About.com Gardening: Most Popular Articles]
Read More...
[Source: About.com Gardening: Most Popular Articles]
"Make everything as simple as possible, but not simpler"
The quote by ~ Albert Einstein
"Make everything as simple as possible, but not simpler" ~ Albert Einstein, originally uploaded by Abby Lanes.

Read More...
[Source: Simply Flowers]
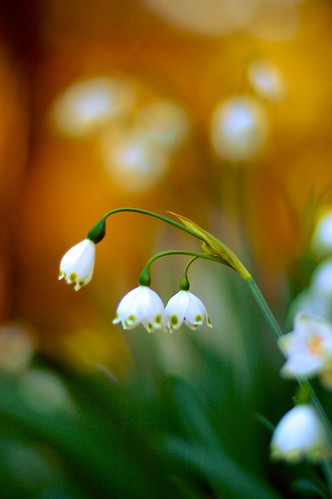
"Make everything as simple as possible, but not simpler" ~ Albert Einstein, originally uploaded by Abby Lanes.
These flowers are the are the "Summer Snowflake" or Loddon Lily (Leucojum aestivum)
Here's the wikipedia link if you want more information. Apparently they don't care that it's winter in California.
I found them under a tree at Descanso Gardens, in La Canada / Flintridge, California.
en.wikipedia.org/wiki/Leucojum
Read More...
[Source: Simply Flowers]
Orchids Enjoying the Florida Sunshine.
Orchid hybrid Paphiopedlum Red Baroness in bloom.
Read More...
[Source: About.com Gardening: Most Popular Articles]
Read More...
[Source: About.com Gardening: Most Popular Articles]
Winter Greens
Growing winter greens in California.
Read More...
[Source: About.com Gardening: Most Popular Articles]
Read More...
[Source: About.com Gardening: Most Popular Articles]
Choose Your Containers Wisely
I put a lot of thought into what I plan to grow each year. My gardens are more of a laboratory than a cohesive design, so I have a...
Read More...
[Source: About.com Gardening]
Read More...
[Source: About.com Gardening]
Phenology
How do you know when to plant? Well, there are no guarantees, but if you let nature tell you when it�s safe to plant seeds or put your plants out, you�re probably on the right track. Nature sends certain signals that will let gardeners know how the weather and climate are progressing. There�s a science devoted to this, called phenology. It is useful to gardeners, as a guide for when to plant. For instance, plant your peas when the forsythia blooms. Here are a few more phenology tips.
Read More...
[Source: About.com Gardening: Most Popular Articles]
Read More...
[Source: About.com Gardening: Most Popular Articles]
Row Covers
Row Covers, sometimes referred to as Floating Row Covers, are lightweight spun bonded synthetic fabrics that are laid over plants for protection against pests and temperatures. They are light enough to rest on the plants and allow light, water and even fertilizer to get through. Here�s what to look for.
Read More...
[Source: About.com Gardening: Most Popular Articles]
Read More...
[Source: About.com Gardening: Most Popular Articles]
Featured Plant: Viola
One of the first signs of spring, after mud, is the sudden appearance of pansies and violas in the garden center. You know planting time is just around the...
Read More...
[Source: About.com Gardening]
Read More...
[Source: About.com Gardening]
Thursday, January 22, 2009
Garden Insect Pests
Plants need insects for pollination, so no garden should be insect free, but there's no denying some insects are garden pests. Learning to identify which insects to worry about and which to welcome is part of the learning process of gardening. Here are a handful of common garden insects. Some are garden pests, some are beneficial and some are just passing through. Always assess the situation before spraying. But when you must treat the problem, the info offered here will be helpful.
Read More...
[Source: About.com Gardening: Most Popular Articles]
Read More...
[Source: About.com Gardening: Most Popular Articles]
Gardening Question of the Week: What Ornamental Small Trees Can Be Grown in a Container?
Peardrops wants some help in finding ornamental trees that can grow in containers. "Hi there,I am new to the forum today just like to say hi to every one. Any...
Read More...
[Source: About.com Gardening]
Read More...
[Source: About.com Gardening]
Smiling Faces.
Unexpected snow in a Washington State garden.
Read More...
[Source: About.com Gardening: Most Popular Articles]
Read More...
[Source: About.com Gardening: Most Popular Articles]
Wednesday, January 21, 2009
Deer Control with Perennial Groundcovers
Take care of 2 landscaping problems with 1 solution - Deer resistant groundcover alternatives for lawns. Lawns have their place, but there are shady nooks and outer reaches...
Read More...
[Source: About.com Gardening]
Read More...
[Source: About.com Gardening]
Yuletide Camellia.
Yuletide Camellia....blooms from December through January.
Read More...
[Source: About.com Gardening: Most Popular Articles]
Read More...
[Source: About.com Gardening: Most Popular Articles]
"Sea Grapes" Tree in Southern Florida.
"Sea Grapes" Tree in Southern Florida.
Read More...
[Source: About.com Gardening: Most Popular Articles]
Read More...
[Source: About.com Gardening: Most Popular Articles]
A Light Snowfall Signals the End of Garden Season.
A light snowfall ends garden season.
Read More...
[Source: About.com Gardening: Most Popular Articles]
Read More...
[Source: About.com Gardening: Most Popular Articles]
Simple Gifts

This title was inspired by the music at today's historic inauguration.
The rose is layered with an oil texture, and was found in the Descanso Gardens, rose garden.
Here's the performance of "Simple Gifts" on youtube.
http://www.youtube.com/watch?v=02Ao9jyq5Vk
Read More...
[Source: Simply Flowers]
Snow Frosted Garden.
Snow covered garden in Winston-Salem, NC.
Read More...
[Source: About.com Gardening: Most Popular Articles]
Read More...
[Source: About.com Gardening: Most Popular Articles]
When To Start Plants From Seed
Starting plants from seed is one of the most rewarding gardening practices - if only for the chance to get your hands in the soil in the dead of winter....
Read More...
[Source: About.com Gardening]
Read More...
[Source: About.com Gardening]
Tuesday, January 20, 2009
Saving Tomato Seeds
Many plant seeds can be saved simply by collecting them as they dry. Tomatoes take a bit more work. The tomato seeds are enclosed in a gel like sack that contains growth inhibitors, preventing the seeds from sprouting inside the tomato. The best way to remove this gel covering is to allow the fruits to rot and ferment. In nature this happens when the fruit falls off the plant. For seed savers, we're going to speed up the process.
Read More...
[Source: About.com Gardening: Most Popular Articles]
Read More...
[Source: About.com Gardening: Most Popular Articles]
Hydrangea Types
There are many new hydrangeas on the market that take the guess work out of when or if you need to prune your hydrangea. However many of us have old hydrangea shrubs in our yards that can cause a lot of frustration when they don't bloom. Bloom on an older hydrangea usually depends on when it was pruned. To know when to prune your old fashioned hydrangea, you'll need to know what type of hydrangea it is. Here's some help in identifying your hydrangea.
Read More...
[Source: About.com Gardening: Most Popular Articles]
Read More...
[Source: About.com Gardening: Most Popular Articles]
Winter Blooming Cherry Tree ~ Prunus subhirtella

I visited Descanso Gardens during the winter season. I was surprised to learn, while walking through the roses, that there is a Winter Blooming Cherry Tree. Interestingly, in researching this delicate beauty, it is a difficult tree to own. You must find the perfect spot, give it meticulous care, and care for it constantly as it is disease prone.
Descanso Gardens had it located in a sunny spot in the rose garden. Amidst the barren roses, it stood out in all it's glory. For sure, this was my find of the day while visiting this lovely garden.
Read More...
[Source: Simply Flowers]
Small Garden Focal Points
Focal points are used in garden design to draw and direct the eye. This can be difficult to accomplish in a small garden when every space is immediately visible and no space can be sacrificed. But it�s not impossible and creating a focal point (or 2) in a small space garden can actually make it appear larger.
Read More...
[Source: About.com Gardening: Most Popular Articles]
Read More...
[Source: About.com Gardening: Most Popular Articles]
Monday, January 19, 2009
Five Poisonous Plants
There are many plants we've all been warned to avoid, like caster bean, foxgloves and Datura. But there are many common garden and house plants that can cause poisoning problems, from contact dermatitis to death. Use extreme caution when gardening around small children and pets. There are many excellent web sources you can turn to, listing which plants are poisonous and what problems they cause. Here are 5 common plants you may never have considered as poisonous and dangerous.
Read More...
[Source: About.com Gardening: Most Popular Articles]
Read More...
[Source: About.com Gardening: Most Popular Articles]
Garden Art and OrnamentsSimple Secrets for Selecting Outdoor Statuary
What makes one garden statue look like it belongs there and another look completely out of place? According to professional garden designers, most of us tend to purchase garden...
Read More...
[Source: About.com Gardening]
Read More...
[Source: About.com Gardening]
Pothos
Pothos is arguably the easiest houseplant to grow. Pothos is tolerant of low light conditions and erratic watering. Pothos are also high on the list of plants that can help purify indoor air. Here's how to keep your pothos growing.
Read More...
[Source: About.com Gardening: Most Popular Articles]
Read More...
[Source: About.com Gardening: Most Popular Articles]
Featured Photo of the Week: "Amazon Passion"
I got some wonderful photo submissions when I asked for shots of your garden in winter. Some are blankets of white and others, like Simon Aiken's South Africa garden...
Read More...
[Source: About.com Gardening]
Read More...
[Source: About.com Gardening]
Soap Bubbles in the Stream
Garden Decorations - Gazing Globe Soap Bubbles
Read More...
[Source: About.com Gardening: Most Popular Articles]
Read More...
[Source: About.com Gardening: Most Popular Articles]
Lighting for Houseplants
Determining how much light an indoor plant needs is about as vague as determining how much water it needs. However, most houseplants don�t like to be placed in the direct sun of a windowsill. Strong sunlight may actually burn their leaves.
Read More...
[Source: About.com Gardening: Most Popular Articles]
Read More...
[Source: About.com Gardening: Most Popular Articles]
Choosing Garden Ornaments
What makes a garden statue look like it belongs there and another look completely out of place? Most of us tend to purchase garden art that is just too small and so then we buy a lot of it. Of course, like all art, personal preferences should always be considered. But there are some simple guidelines for choosing garden ornaments that complement your garden and that you won't have to keep explaining over and over to your friends.
Read More...
[Source: About.com Gardening: Most Popular Articles]
Read More...
[Source: About.com Gardening: Most Popular Articles]
Wash Tub Planter
Garden Art - Old Wash Tub as Flower Planter
Read More...
[Source: About.com Gardening: Most Popular Articles]
Read More...
[Source: About.com Gardening: Most Popular Articles]
Spring Rose Care
A bit of spring rose care will mean healthier roses throughout the growing season. Although roses may bloom even if gardeners neglect them entirely, they will have fewer problems and more blooms if you do some spring rose pruning and feeding, as outlined below. The efforts you make in caring for your roses in the early spring will mean that many fewer problems to tend to during the growing season.
Read More...
[Source: About.com Gardening: Most Popular Articles]
Read More...
[Source: About.com Gardening: Most Popular Articles]
Friday, January 16, 2009
Companion Planting Vegetables
Companion Planing in the Vegetable Garden
Read More...
[Source: About.com Gardening: Most Popular Articles]
Read More...
[Source: About.com Gardening: Most Popular Articles]
The Year of the Chile Pepper
Growing hot chili peppers is easy and possible almost anywhere. But the real enjoyment of growing your own hot peppers is harvesting them and using them. Here are some tips.
Read More...
[Source: About.com Gardening: Most Popular Articles]
Read More...
[Source: About.com Gardening: Most Popular Articles]
Koreanspice Viburnum or Korean Spicebush (Viburnum carlesii)
Koreanspice Viburnum (Viburnum carlesii)
Read More...
[Source: About.com Gardening: Most Popular Articles]
Read More...
[Source: About.com Gardening: Most Popular Articles]
Smooth Witherod Viburnum (Viburnum nudum)
Smooth Witherod Viburnum (Viburnum nudum)
Read More...
[Source: About.com Gardening: Most Popular Articles]
Read More...
[Source: About.com Gardening: Most Popular Articles]
Thursday, January 15, 2009
Gardening Question of the Week: Can I Save a Spruce That's Lost It's Top Half?
Jayphog wrote into the Forum: "My 5' tall blue spruce was recently decapitated. The top 2' was sheared off after a typical Kansas windstorm knocked a branch off a neighboring...
Read More...
[Source: About.com Gardening]
Read More...
[Source: About.com Gardening]
Winterberry Holly
Ilex verticillata, Winterberry Holly, or Winterberry is our native, wetland holly that loses it leaves each autumn. This beautiful shrub is all the more showy because its lack of winter leaves makes its berry display all the more showy. After the leaves have turned yellow and have fallen off, you are left with a breathtaking view of thousands of brightly colored berries clinging to every stem. What a joy to have such color in the middle of winter.
Read More...
[Source: About.com Gardening: Most Popular Articles]
Read More...
[Source: About.com Gardening: Most Popular Articles]
The Ginkgo Tree

I visited the Huntington Botanical Gardens in San Marino, California. Everything about that garden is peaceful and magical, but with the changing leaves and blooming camellia's the Japanese Garden was particularly perfect. A must see, if you're in Southern California.
Read More...
[Source: Simply Flowers]
Wednesday, January 14, 2009
Free Christmas Desktop Wallpaper
 It's Christmas For Your Computer!
To keep everyone inspired this holiday season, we have devleoped free Christmas desktop wallpaper for your computer!
They work great for both PC or Mac, and in addition to Christmas, there are all different holiday plants, flowers, and berries. So liven up your computer desktop during the holiday season!
To the right you can see just 3 examples, but to see all wallpapers go to:
Free Christmas Desktop Wallpaper
For more Gardening Tips and Gardening Advice visit our main gardening website at Weekend Gardener Monthly Web Magazine - www.weekendgardener.net
Have great week and Happy Holidays!
Read More...
[Source: Gardening Tips and Ideas]
Super Easy Summer Cuttings
 Propagating your own plants was never easier! Here are a few warm weather plants that will root from cuttings stuck directly in the ground:
Ageratum
Coleus
Fuchsia
Dahlia
Impatiens
Wax begonia
Geranium
Iceplant
Felicias
All you have to do is take a 2 to 4 inch (5 - 10 cm) cutting, strip any flowers and most of the foliage off, leaving just a few leaves on top.
Then insert them directly into loose soil where they are to grow.
Keep them moist until they establish. Moist, not soaked, otherwise you will rot them!
That's it.
For more Gardening Tips and Gardening Advice visit our main gardening website at Weekend Gardener Monthly Web Magazine - www.weekendgardener.net
Talk to you next week!
Read More...
[Source: Gardening Tips and Ideas]
How Many Seeds Per Ounce or Gram
Many seed packets and mail order catalogs list how many seeds you are buying by the ounce or by the gram, but they don't tell you how many actual seeds you are getting. The conversions below should help clear this up so you can better estimate how much seed you'll need to buy.
Vegetable Seeds Per Ounce
(454 grams = 1 ounce)
Beets: 1,600
Broccoli: 9,000
Brussels Sprouts: 9,000
Cabbage: 9,000
Carrots: 23,000
Corn: 120-180
Cucumbers: 1,100
Eggplant: 6,500
Lettuce: 25,000
Onions: 8,500
Peas: 90-175
Peppers: 4,500
Pumpkins: 100-300
Radishes: 2,500
Snap Beans: 100-125
Spinach: 2,800
Squash: 120-400
Tomaotes: 11,500
Flower Seeds Per Ounce
(454 grams = 1 ounce)
Blanket Flower: 15,000
Calendula: 3,500
Candytuft: 9,500
Coneflower: 40,000
Cornflower: 6,000
Cosmos: 4,000 - 5,000
Larkspur: 8,000
Marigold: 9,000
Morning glory: 800
Nasturtium: 175
Poppy: 260,000
Stock: 18,500
Strawflower: 45,000
Sunflower: 500-700
Zinnia: 2,500 - 4,000
For more Gardening Tips and Gardening Advice visit our main gardening website at Weekend Gardener Monthly Web Magazine - www.weekendgardener.net
Have good week!
Read More...
[Source: Gardening Tips and Ideas]
How To Remove Tree Sap
 Trying too remove tree sap, depending upon what it is stuck to can be hard!
At this time of year, working with trees and greens for holiday arrangements, hauling wood, or setting up the yearly Christmas tree, you can end up with sap stuck just about anywhere.
The good new is that even though each type of tree has a different type of sap, they all have similar properties, and there are multiple safe ways to get rid of it.
Here are some quick tips to get rid of the sticky stuff from your hands, hair, clothes, and car:
How To Remove Tree Sap From Your Hands:
1. Mayonnaise
Simply rub mayonnaise on your hands and then wash it off with warm soap and water.
2. Mineral Spirits or Paint Thinner
Grab an old rag or a paper towel and pour some of the mineral sprits or paint thinner onto the rag. Hold it against the sap for a moment, then dab and rub gently, turning the rag as you go to wipe the sap off. Then wash your hands well with soap and warm water
Remove Tree Sap From Your Hair:
The key to getting rid of tree sap from your hair is to get it while it's fresh. As the sap hardens, it become increasingly difficult to get it out.
Also, it's important to let anything that is applied to the hair "sit" for an extended period of time. The longer that a product is applied to the sap, the better the chances will be of removing it.
1. All-natural peanut butter
Oilier peanut butters tend to work better. Cover the area fully. Using a hair dryer or other heating device, apply warm heat to the peanut butter until it begins to soften. Then, using a straight-toothed comb, pull the softened peanut butter through the hair. Rinse out with hot water.
2. Mayonnaise, Crisco, or other shortenings
The oils in the mayonnaise help to break down the sap's hard consistency, making it easier to remove. Allow the mayonnaise to sit on the area for several minutes, then rinse.
3. Pure soaps, such as Ivory
Work the area into a rich lather, rinse with warm water, and repeat until the sap has been removed.
4. Baking soda
Apply the baking soda to a warm, damp rag and rub the affected area vigorously until the sap dissolves.
5. Pine oil can dramatically cut tree sap
This product can usually be found at natural food stores, homeopathy stores, or herbal retailers.
6. Any grease-cutting dish detergents will also do the trick
Remove Tree Sap From Your Clothing:
1. Hand sanitizer
This works really well and in just a matter of minutes! All you need to do is simply squeeze it onto the area, and start to rub. If it is really stubborn, you can scratch at it with your fingernail, but in most cases this won't be necessary. Be sure to apply enough, so don't be stingy, your clothes are at risk here. Works well on on fleece, polyester, cotton, just about everything except silk, or leather, so be careful.
2. For leather (Jackets, skirts, motorcycle seats) its still fairly easy, just use a little peanut butter (do NOT use chunky). Rub it into the leather. Don't be afraid of rubbing this in, the oil will also act a bit like a conditioner for the leather. You will notice within minutes, the tree sap will be gone! Now take some warm soapy water and wash the peanut butter off.
3. Plumbers hand cleaner
Removes dried tree sap from clothing in snap.
Remove Tree Sap From Your Car:
If there is a large amount of sap on the car, or if the sap has been left on the finish for an extended period of time, it can be a lot of work to remove.
The goal is to use the least pressure possible to reduce the risk of scratching the paint. After removing heavy sap, always buff the treated areas with a good polish to clean up any marks created during hand-rubbing with solvent. The treated area must also be re-waxed.
1. Finger nail polish remover on a cotton ball
After the sap is removed, make a paste of water and baking soda to wash the affected area, then apply wax.
2. Mineral sprits (it will also remove tar)
Use a soft, terry towel, or wash cloth dampened with mineral sprits. After removal, wash the car and apply wax to the affected area.
3. Rainx
4. Bacon grease or lard
Just rub it on, and off comes the sap.
5. Automotive clay
As you rub it across any type of surface (paint, glass, plastic, metal, rubber, vinyl) it instantly sticks-to and pulls-off all contamination that is stuck to the surface.
When you're finished claying your car, you should go over it with a pre-wax cleaner to finish cleaning the paint and restore essential oils. Then, protect your newly cleaned finish with one or more coats of rich wax.
Note: If you try any one of the above tricks on how to remove tree sap, please feel free to leave your comments on what you found most helpful and effective, including what type of tree sap you used it on, so we can keep making the list better for those of us who have sat, stepped, handled, or run into the darned stuff!
For more Gardening Tips and Gardening Advice visit our main gardening website at Weekend Gardener Monthly Web Magazine - www.weekendgardener.net
Have good week!
Read More...
[Source: Gardening Tips and Ideas]
The Best Time To Harvest Herbs
 There is one time of day that is better than all others to harvest herbs, and that is first thing in the morning.
 Why?
Because the plants have rested overnight and their oils and moisture are concentrated in their leaves.
During the day, or when temperatures start to warm up, the plants are busy growing and transpiring and their oils and moisture are moving all through the plant.
So if you want strong herb flavor and aroma, harvest herbs first thing in the morning before they start actively growing for the day.
More about herbs:
Learn how to make your own kelp spray
Get a list of the best herbs to grow indoors
Read: Kelp Helps Indoor Grown Herbs Stay Healthy
For more Gardening Tips and Gardening Advice visit our main gardening website at Weekend Gardener Monthly Web Magazine - www.weekendgardener.net
Have good week!
Read More...
[Source: Gardening Tips and Ideas]
Growing Gardenias
 Hilary, I had a question for you:
 My favorite flower is the gardenia; however, I've failed three times now to keep one alive, though one of those I can attribute to an infestation of bugs.
I've read about them and tried to follow the directions of keeping them out of drafts, misting them, and keeping them at a cool but sunny location. Any suggestions?
Eileen Sagraves
Hi Eileen,
Thank you for your question. Well, you know, Gardenias are so tough to grow. If you can get them in just the right place, they will thrive, otherwise - well you know about the otherwise.
It sounds like you are doing all the right things, but in case it might be helpful, here is our information page on gardenias: Gardenia Growing Tips Page
The only other suggestions I have for you are:
1. Provide even watering. They don't like to be too dry or too wet - it has to be just right
2. Rather than misting to provide humidity, I would try a large pebble tray because it gives even humidity over a longer period of time. Misting can sometimes cause problems with gardenias.
3. Make sure your nighttime temperatures are not too hot.
Read the detailed information page above, and let me know how it goes!
For more Gardening Tips and Gardening Advice visit our main gardening website at Weekend Gardener Monthly Web Magazine - www.weekendgardener.net
Have good week!
Read More...
[Source: Gardening Tips and Ideas]
Planting Corn and Growing Tips
 Corn is quite easy to grow, but it does need some extra attention throughout its growing season to get the best crop possible.
 Here are a couple of tips for planting corn and how to properly care for it, so you have the most success.
Temperatures: Corn germinates poorly in cool soil, it likes warmer temperatures. Optimum growth occurs in 65° to 75° F (18° to 24° C) weather, and does well up to 90° F (32° C), but it does very poorly at temperatures of 100° F (38° C) or above.
Spacing: Corn rows should be at least 3 feet (1 m) apart, and each plant should be a minimum of 9 inches (23 cm) apart. Plant in blocks so the wind can pollinate the corn properly.
Planting: When planting, put down a balanced fertilizer like 15-15-15 or 5-5-5. If the weather is warm, sow seeds 1 inch (2.5 cm) deep. If planting in the middle of hot summer weather, sow up to 4 inches (10 cm) deep.
Side-Dressing: Corn is a heavy feeder and needs to have fertilizer put along the root zone on one side of each row (side-dressing) a few times throughout its growing cycle. Side-dress once when the corn is around 6 inches (15 cm) tall. Side-dress on the other side of the row when you see tassels forming on the plants.
Watering: Water corn as needed. Corn needs at least 1 inch (2.5 cm) of water per week. If you have no rain, give the soil a good soaking and then allow the soil to dry between waterings. Have some care though and don't water corn from above, because that can wash the pollen off the tassels and you won't get any corn!
Avoid Cross Pollination: Keep different corn cultivars at least 400 yards (365 m) apart, or plant so they tassel two weeks apart to avoid any possibility of cross pollination.
Harvesting: Three weeks after corn silks appear on the ears, carefully pull back part of the husk and pierce a kernel with your thumbnail. If the liquid that comes out is milky white, the sweet corn is ripe and ready to eat.
For more Gardening Tips and Gardening Advice visit our main gardening website at Weekend Gardener Monthly Web Magazine - www.weekendgardener.net
Have good week!
Read More...
[Source: Gardening Tips and Ideas]
How To Buy Quality Seed
 During the cooler months of fall and winter, we can be carried away by the pretty seed packets we see in the store - but don't!
 You're usually better off using the stores to get ideas, and then use seed catalogs to compare prices and see what's new for the year.
Seed catalogs also give you more information about what you're buying and have a quality guarantee that most stores don't have.
Overall, here are four tips on how to buy quality seed:
1. Check The Date: If you do decide to buy seeds in the store, and not a catalog, make sure the current year is stamped on the envelope. If the date is not current, then don't buy it, because fresh seed germinates better and more reliably than old seed.
2. Know The Difference Between Pelleted and Untreated Seed: Pelleted seed has been coated so the seeds are easier to handle and plant. Seeds that have been pelleted can look bigger than they actually are, so the packets may not really have that many seeds, they just look big. Read seed packets and catalogs carefully so you're not disappointed if you end up with fewer seeds than you expected.
3. Look For Disease Resistance: If you have plants that regularly get certain diseases like powdery mildew or rust, look for disease-resistant cultivars. Compare several seed catalogs to see what they carry and find the best choices for your situation.
4. Know What Labels Mean: Some labels will have special names on them like: All-America Selections Winner, or Gold Ribbon Selection.
All American Selections Winner means that it has received an award for excellence after being tested in trial grounds throughout the United States and Canada. To receive the award, the cultivar must perform well around the entire country, so you have a good chance it is going to do well for you in your area. This doesn't mean it will be the best cultivar for your garden, you mind find other cultivars that do better, but it is a sign of excellence.
Gold Ribbon Winner means it is a professional-grade product, and usually a high-priced hybrid that has some exceptional qualities to make it better than other seed.
Overall, read the information about seed carefully, and if you do buy from a catalog, the good news is that you can always contact them for more information and help in choosing what is going to perform really well for you.
Next week, we're going to talk about how many seeds per packet you can expect.
For more Gardening Tips and Gardening Advice visit our main gardening website at Weekend Gardener Monthly Web Magazine - www.weekendgardener.net
Have good week!
Read More...
[Source: Gardening Tips and Ideas]
Container Gardening In The Heat
 DOUBLE POTTING BEATS THE HEAT!
Hot summer days are on the way, and if you have outdoor plants in containers, you know how they can take a beating.
Here's a simple way to help your plants survive the heat, and retain moisture.
By using two pots, also known as double potting, you can prevent the roots of sun-baked containers from overheating.
All you do is place the plant, pot and all, into a bigger pot.
After you have done that, fill the space between the two containers with damp peat moss. The layer of damp peat moss will keep the inner pot and plant roots cool and moist during the summer heat.
Your plants will do much better.
For more Gardening Tips and Gardening Advice visit our main gardening website at Weekend Gardener Monthly Web Magazine - www.weekendgardener.net
Have good week!
Read More...
[Source: Gardening Tips and Ideas]
Sod Laying Tips
 This is the perfect time of year to be seeding or sodding a lawn. While seeding is the most cost effective, using sod is nice too, because you can have an instant lawn.
 If, however, you have never put sod down before, dont' worry. It's not hard, and to help you out, here a couple of tips.
Laying the blocks:
Stagger the blocks of sod so they lay in a checkerboard fashion. The turf will knit together more neatly and quickly. The most natural way to do this is to start your second row with a half-block of sod.
Sodding on a slope:
On a slope, always lay the rows of sod across the slope, not up and down.
Patching up bare spots:
Try to do any patching on the inside of the lawn area. Pieces along the peripery should be whole, otherwise they can dry out and die.
Also, if you are patching as part of a renovation, like to cover an area where a tree was, you should use whole blocks of sod, even if the spot in need is smaller than that.
The smaller the piece, the harder it is to keep it alive. So try to cut out a spot big enough for an entire block of sod to be put down.
Having a healthy, green lawn is always a nice sight. So if you want one, now is a good time to do it!
For more Gardening Tips and Gardening Advice visit our main gardening website at Weekend Gardener Monthly Web Magazine - www.weekendgardener.net
Have good week!
Read More...
[Source: Gardening Tips and Ideas]
Growing Rose of Sharon and Overwintering Tips
 Rose of Sharon (Hibiscus syriacus), for many, is an easy to grow shrub that they would consider more of a weed than a plant!
For others however, they can have some problems, so let's go over Rose of Sharon's needs and how to best overwinter them if you're in a very cold northern climate.
Rose of Sharon Basic Growing Needs:
Do well in Zones 10 to 5 which means they can tolerate winter cold from 40° F (4.4 ° C) down to -20° F (-29° C)
Prefers full sun and heat, and tolerates some drought. If in a very hot area, afternoon shade may be a benefit
Likes moist, well-drained soil with regular water but not too much. They don't like soggy or wet soil, and can have yellowing leaves and leaf drop if soil is a heavy clay or doesn't drain well. In that case, allow plants to dry out a bit in between waterings
Try not to fertilize after July. You don't want to encourage lots of soft growth that will be harmed by frost in the fall
Where winters drop to -10° F (-23° C) or colder, protect plants with winter mulch
Growth Habit:
A deciduous shrub (but can be an evergreen in warmer climates)
Grows to 12 feet (3.5 m) tall with a spread of 3 to 6 feet (1 to 1.8 m)
Flowers all summer long into early fall (until frost) in shades of white, pink, soft red, mauve, and violet blue
Flowers attract hummingbirds
Leafs out in the spring much later than most other deciduous shrubs which can cause a false alarm for gardeners who think their plants may have died. Patience in this case is the best remedy
Foliage drops in the fall without coloring
Prune to shape in the first two years of growth, trimming lightly thereafter to maintain a compact form. If the plant needs a heavy pruning, the best time to do so is in late winter, early spring. Light shaping or pruning can be done at any time
Overwintering Rose of Sharon:
Rose of Sharon will do better if left in the ground to overwinter
One of the biggest tips is placement! Make sure your plants are out of direct heavy winds
Mulch heavily with leaves in fall and use burlap around the bush in the winter to help insulate it. You may not want to mulch until your ground is frozen so as not to attract voles or mice to the mulch. But if they have not been a problem, you can go ahead and mulch after the leaves have fallen from the trees.
Reliable snow cover all winter helps insulate them from the cold
Don't prune it until spring....that way you can cut off any winter die back that you might get. They also bloom better after a good pruning in the spring as they bloom on new wood
For more Gardening Tips and Gardening Advice visit our main gardening website at Weekend Gardener Monthly Web Magazine - www.weekendgardener.net
Have good week!
Read More...
[Source: Gardening Tips and Ideas]
Never Lose Your Tools Again!
 Have you ever been working outside, and you needed to go do something else, so you put your tool down only to come back and wonder where you put it? Well no more!
 Paint the handles of your trowels, hoes, shovels, rakes, etc. Paint them with your favorite color, or with really loud, bright colors like red, bright orange, yellow, or even pink. This will serve 2 purposes:
1. You�ll never lose your tools again
2. If anyone wants to borrow your tools, there is never a question that it�s yours when you ask for it back!
For more Gardening Tips and Gardening Advice visit our main gardening website at Weekend Gardener Monthly Web Magazine - www.weekendgardener.net
Have good week!
Read More...
[Source: Gardening Tips and Ideas]
Monthly Gardening Tips On Free Gardening Calendars
 New and Updated For 2009!
Each free gardening calendar comes with two to three pages of gardening tips and "to dos" that are appropriate for that time of year .
Tips include what to plan, plant, prune, maintain, plus weed and pest control and fun projects.
Print out as many as you want!
Simply go to:
Monthly Gardening Tips and To Do Lists
For more Gardening Tips and Gardening Advice visit our main gardening website at Weekend Gardener Monthly Web Magazine - www.weekendgardener.net
Have great week and Happy Holidays!
Read More...
[Source: Gardening Tips and Ideas]
Saving Seeds From Hybrid Plants
 Saving seeds from our favorite plants in order to grow them again next year, is a great way to propagate your own fruit, flowers, and vegetables.
 A word of caution however if you're thinking about saving seed from hybrid plants. You need to understand that any plants grown from seeds of hybrids will not come true to type.
Let me explain.
Hybrid seed is created by crossing two highly inbred cultivars.
When the two inbred parents are crossed with each other, the result is F1 hybrid seed.
The seed companies have to repeat this exact same cross every year to produce F1 hybrid seed, such as 'Bolero' marigolds, or 'Early Girl' tomatoes.
These F1 hybrids have the best of both parents giving them hybrid vigor, but any seed that comes from a hybrid will be something completely different.
This is no bad thing. You just might come up with a really great new tomato growing seeds from hybrids. Just keep in mind, that any seed from a hybrid plant will not be true to type, and will not resemble the plant it came from.
You will always easily know if the plants you have are hybrids or not because every plant and seed packet is marked on its label.
For more about seed saving and how to do it - read: How To Save Seeds
For more Gardening Tips and Gardening Advice visit our main gardening website at Weekend Gardener Monthly Web Magazine - www.weekendgardener.net
Have good week!
Read More...
[Source: Gardening Tips and Ideas]
Grow & Make Your Own Luffa Sponge!
 Luffas sponges are probably best known for use in the shower to exfoliate your skin, but they can also be used for washing dishes or windows.
 If you have never done this, here is an opportunity to grow and make your own luffa sponge!
There are several species of Luffa plants that you can do this project with, and they are:
Luffa cylindrica
Luffa acutangula
Luffa aegyptiaca Mill
They are all in the Cucurbitaceae family. Most seed catalogs offer luffa seeds, so they are not hard to find.
Growing the plants:
1. The plants are very easy to grow with no insect problems, but frost will kill these plants so be careful to make sure either it is warm enough out, or you give them some frost protection until all threat of frost is over.
2. They need around 4 to 5 months to grow and produce sponges that you will be able to use, so sowing your seeds now, in the spring or early summer is the best time.
3. Like many gourd and squash plants, they like full sun, regular water, and they are natural climbers so you can train the vines up a trellis or fence, or up the side of a wall or your house.
4. The fruit is edible when young, but will get very tough to eat if allowed to get too big.
5. They can get about 15 feet (4.6 m) tall.
Making the sponge:
1. Harvest mature sponges in the fall; you can pick the fruit just after the first frost kills the vine, and then peel off the outer skin.
2. Cut of the ends, and then squeeze the fruit repeatedly from the middle towards the ends to remove the pulp and seeds that are inside. Some people call this �milking� the squash.
3. If seeds do come out, make sure you set some aside for next year!
4. Next, if the sponge is discolored, soak it for 5 minutes in warm water with a little bit of bleach.
5. Allow the sponge to dry thoroughly by hanging them up or placing them on a drying rack.
6. Last, make sure to clean your luffas throughout the year in the washing machine. Most luffa sponges will last for years!
Note: It is also possible to dye the luffas if you want your sponge to be a different color than it�s natural tan.
For more Gardening Tips and Gardening Advice visit our main gardening website at Weekend Gardener Monthly Web Magazine - www.weekendgardener.net
Talk to you next week!
Read More...
[Source: Gardening Tips and Ideas]
Wood Ash In My Garden As A Fertilizer
 At this time of year with the cooler weather, a lot of people want to know if they can, or even should, use wood ash in the garden as a fertilizer, or soil conditioner.
Well, let's take a quick look at the variables:
1. Wood ashes will raise soil pH because the largest component of wood ash (about 25 percent) is calcium carbonate, a common liming material that increases soil alkalinity. So generally use them only if your soil pH is under 7.0 based on a soil test.
2. The safe rate of wood ash application to lawn or gardens is 15 to 20 lbs. (7 to 9 kg) per 1000 square feet (93 square meters) per year, which is approximately a 5 gallon (19 l) pail.
3. Remember, a little wood ash is beneficial, but a lot is not because increasing the alkalinity of the soil does affect plant nutrition. Nutrients are most readily available to plants when the soil is slightly acidic. As soil alkalinity increases and the pH rises above 7.0, nutrients such as phosphorus, iron, boron, manganese, copper, zinc and potassium become chemically tied to the soil and less available for plant use.
4. Wood ash does have some fertilizer value, the amount varying somewhat with the species of wood being used. Generally, wood ash contains less than 10 percent potash, 1 percent phosphate and trace amounts of micro-nutrients such as iron, manganese, boron, copper and zinc.
5. Trace amounts of heavy metals such as lead, cadmium, nickel and chromium also may be present. Wood ash does not contain nitrogen.
6. Applying small amounts of wood ash to most soils will not adversely affect your garden crops, and the ash does help replenish some nutrients. But because wood ash increases soil pH, adding large amounts can do more harm than good.
7. Crop tolerance to alkaline soil also should be considered. Some plants, such as asparagus and juniper, are more tolerant of slightly alkaline conditions than "acid-loving" plants, such as potatoes, rhododendrons and blueberries. Wood ash should never be used on acid-loving plants.
8. The best thing with wood ash is to use it sparingly, and test your soil pH regularly to make sure you are not causing any problems.
For more Gardening Tips and Gardening Advice visit our main gardening website at Weekend Gardener Monthly Web Magazine - www.weekendgardener.net
Have great week!
Read More...
[Source: Gardening Tips and Ideas]
Save Your Back - Make Your Own Watering Wand!
 There are a couple of reasons why it's best to water plants at the base, around the soil and roots rather than from the top.
1. If you have made wells around your plants, overhead watering can wash them away.
2. Some plants don't like to get their foliage wet, and watering from above, can make them susceptible to moisture-loving fungal diseases.
For some people, however, reaching down that far, especially if you have a lot of watering to do, can be hard on your back. The perfect answer is to make your own watering wand.
To make a watering wand: simply use some sturdy tape, like duct tape, and attach a 4-foot (1.2 m) length of broom stick or old mop handle along the end of your garden hose.
Now you can direct the water precisely around the base of plants, without bending your back and physically challenged gardeners can also use this trick to give them a longer reach.
For more Gardening Tips and Gardening Advice visit our main gardening website at Weekend Gardener Monthly Web Magazine - www.weekendgardener.net
Talk to you next week!
Read More...
[Source: Gardening Tips and Ideas]
Subscribe to:
Posts (Atom)